MAKING A KILN
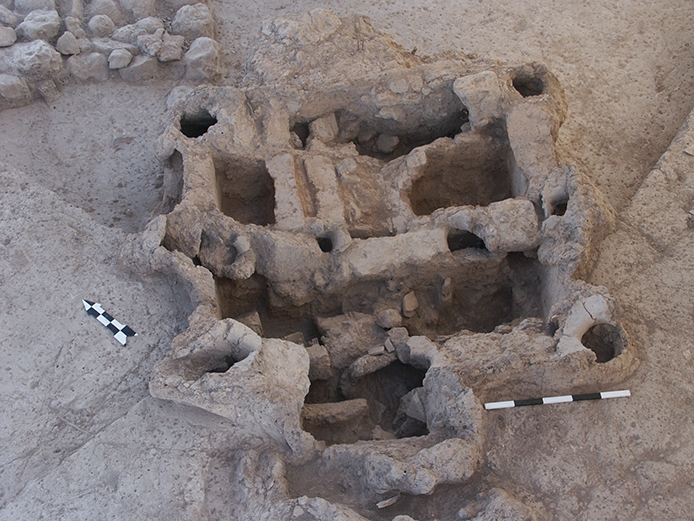
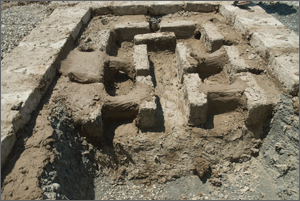
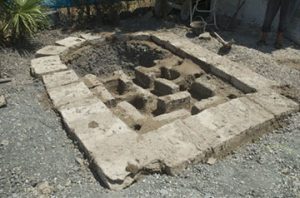
As part of the experimental projects, a replica of a Late Bronze Age kiln was reconstructed with the help and effort of team members. The project was inspired by the exposure in 2004 of a variety of pyrotechnic installations in the eastern part of the mound, where an industrial quarter with some installations designated for the production of pottery, metal, and other materials was located. This evidence coincides with the afternoon wind direction in the Amuq Valley, which always blows from west to east, thus preventing the poisonous effects of smoke from reaching the city. For the experiment, a unique installation example discovered in 2004 in Square 44.80 was selected as a model. Found in very good condition, both the upper stage and lower chamber had been exposed. The firing chamber was visible, but not excavated. Providing a template for pottery firing at the site, an attempt was made duringthe experiment to understand how these installations were constructed and functioned.
The Construction of the Kiln
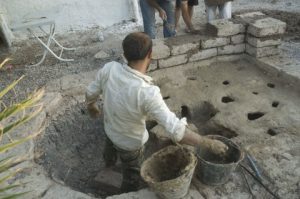
A 1.5 x 1.5 meter area was cleaned at the dig house near the experimental bread oven (tandır). A square space was dug to a depth of 30 cm to allow 20 x 40 cm mudbricks to stand on their short sides. The ground level of the foundation trench was then coated with a mud and straw mixture. This layer provided insulation and functioned as a mortar bedding for the mudbricks. Thirteen (40 x 20 cm) mudbricks were laid along the sides and the central section, creating three rows of horizontal flues in an east-west direction. Three north-south flues were also made to provide air circulation. Along the walls and in between the mudbricks, five spaces were left open in order to place the flues. In the interior section of the kiln, the spaces between the mudbrick rows varied from 20-30 cm. In four spots in between the bricks, additional support was given by making mud bridges. These were used to create a better foundation platform for the next floor level without blocking the air ventilation inside the lower stage. Behind this, a firing pit with a 1.70 m diameter where fuel would be burned was dug to a depth of 1 m. The firing chamber and the lower deck were then separated by a mudbrick wall.
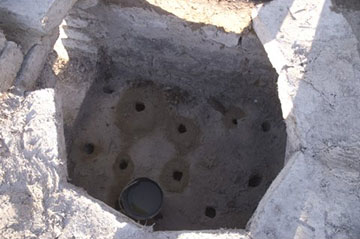
One of the most complicated tasks in building the kiln was the preparation of the upper clay stage that would be on top of the mudbrick foundations. To enable hot airflow from the lower deck up into this platform stage, flues were made in the lower chamber. To seal the lower chamber and in order to create the upper stage, a decision was made to use a technique resembling slab construction. Each day only a portion of the floor was added in the horizontal space. For this type of construction, like in the bread oven, a special type of clay was necessary. East of the Alalakh mound, in the deep cut of a canal constructed to drain Lake Antioch, a strata of light- colored soil provided good quality clay for constructing bread ovens. This clay has traditionally been used by the villagers to make mudbrick and pise structures. Previously, following the same tradition, our bread oven had been constructed from the same source. Since this clay is strong and cohesive, we decided to use it for the kiln stage. Carrying chunks from the canal in sand bags, the clay was afterwards set into water tanks. The clay chunks were levigated with the aid of water, and each day, some was taken out of the tanks to dry. The half dried clay was mixed with straw, and the mixture was laid on top of the brick foundation. This slow process started by moving from the sides of the wall into the interior. It was very important for the clay to stick to the brick support and then slowly move to other spots where no brick support existed. Emulating the excavated examples, in order to enable hot airflow into the upper deck, the upper stage itself was perforated for flue holes. Ten holes were made in the clay surface to provide an equal distribution of airflow without losing the carrying strength of the stage. Based on the coiling technique used, the approximate thickness of the stage surface varied from 2-4 cm in several spots.
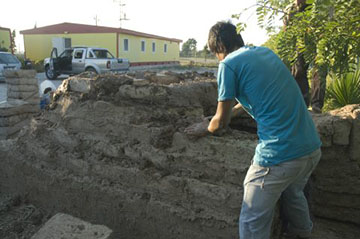
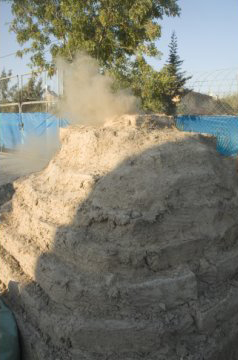
The archaeological record has limited information about the superstructure of the furnace. Therefore, a decision was made to raise the walls of the kiln by using a brick vaulting technique called corbelling. The surrounding walls were elevated by 4 mudbrick courses. Each new course of mudbricks was laid slightly inwards, creating a corbelled arch formation. Each day, only three courses were added to allow the mud and straw combination of mortar to dry. Any attempt to do more would have collapsed the entire structure, since no wooden supports were used. Under the skeptical eyes of many team members, the corbelled arch vault rose to the top, and the central section was left open for the chimney. A door was located on the north side of the structure which could be sealed with mudbricks and a mud and straw mixture in order to provide full insulation for firing. 200 of the previously made AT-stamped mudbricks were used for the construction of the walls.
Once the kiln was ready for use, several thermocouples were located inside during the first firing attempt. One was attached to the wall face of the firing pit, two were located inside the lower chamber, and two more were located on the upper stage. A separate one was attached to the chimney. However, these indicated that, when the heat approached 600 degrees Celsius in the firing pit, the lower and upper stage kept their stable temperature and did not reach higher then 34 degrees. We corrected this error by taking the walls of the firing chamber down to the height of the floor level (since they had previously reached the same level as the rest of the installation) so that the fire in the pit was forced to run through the lower deck, then to the upper stage floor, and finally to the chimney. Unfortunately, when this was done, the experiment was not re-run with thermocouples, due to the absence of our geologist team member , Pinar Ertepinar Kaymakci. However, a trial run to bake a figurine made by our registrar, Ferhat Can, showed that the kiln was functioning properly, except for the fact that it needed more channels to allow smoke to escape in order to provide less oxidization. As the final step in insulating the kiln, the entire structure was sealed with a mud and straw mixture, plastering the dome.