MAKING A TANDIR
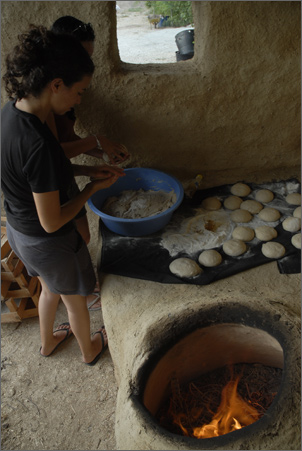
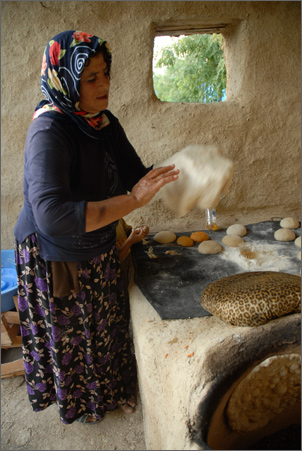
Tell Atchana is an archaeological habitation site with the modern Aççana village located at its southern extremity. Even though the existence of a modern settlement clearly puts the site in danger, the village itself provides good hands-on ethnoarcheological sources for understanding construction methods. Almost all individual houses in the village have one outside bread oven, called a tandır, where the village women make bread every two or three days. It is important to note that these ovens are also used for cooking by modifying the oven with metal frames that serve as pot stands. These ovens share similarities with the ones that we have often discovered in our archaeological contexts. In order to understand more about the use and construction techniques of these pyrotechnic installations, a bread oven was constructed in three stages: 1) making the tandır (the conical part where the firing action occurs), 2) constructing the working platform and structure, and 3) plastering and decoration.
Constructing the Tandir
Ten days were spent installing the conical interior body of the tandır. In terms of raw materials, good quality clay was selected. Our workman, Hasan Ay, identified the quality clay sources presently in use by the village. The drainage canal source is located at the southeastern end of the site. High quality clay of a light brown/buff color is found in the second layer below the surface, which was also used in our experiments targeting local production of ceramics. Emine Ay, our tandır expert, and our team began making the tandır with a layer of straw to prevent it from sticking into the ground. A very important detail emerged in the construction of bread ovens in general: the use of the soft, fibrous interior of the reeds as an additive to the clay mixture. These reeds are also available at the bottom of the drainage canal. Clay, reeds, and water were mixed to the desired level of plasticity and used to shape the tandır.
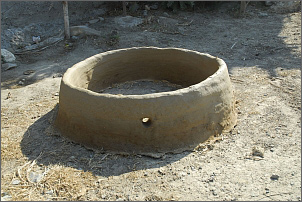
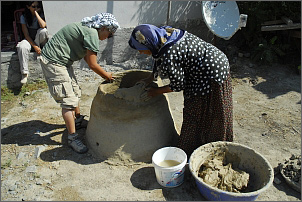
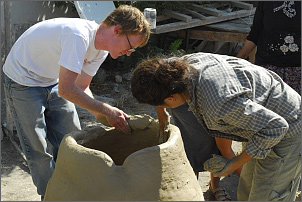
Consistent daily progress is necessary to construct a conical clay bread oven. During the first day of work, a flat metal serving plate was placed on the ground as a scale to create the bottom contours of the tandır. The first coil of the clay mixture was shaped following the outline of the metal plate. After the first layer of clay was dried to a level where it could support the pressure and weight of the subsequent layer, the second layer of clay coil was laid down. Any errors were corrected by our expert, Emine Ay. Ten days of repeated layering of clay coils ultimately resulted in a conical shape. This daily construction technique created separate layers of clay coils, typical in oven fragments found in excavated contexts. After the conical body of the oven was completed, we allowed it to dry for 7 days under the sun. During the drying period, cracks were sealed with a thin layer of clay slip. Since a layer of straw had been laid down at the bottom, we easily relocated it to the dig house when the work was finished.
We constructed a flat platform, which served as a working space adjacent to the oven. This platform was surrounded on three sides with walls constructed to a height of 2.30 m using mudbricks measuring 40 x 40 x 12 cm. After a shallow foundation trench was dug and filled with rubble, it was made water-resistant at the ground level. Three hundred mudbricks were used to construct the entire superstructure; these were the experimental AT bricks made previously.
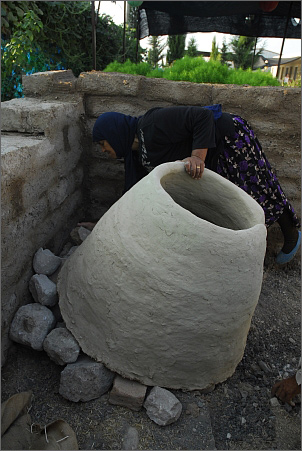
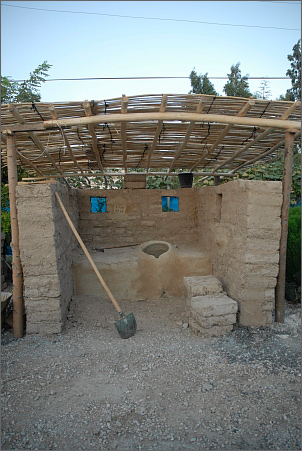
The tandır was located off-center of the platform and slightly to the right, framed by the standing walls. To provide easy access inside the bread oven during the baking process, the tandır was tilted forward at an angle by raising the back of it with stones and mudbricks laid in a semicircular pattern. Next, a partition wall was added abutting the tandır from two sides. The front face was left open with a ventilation hole. The third stage entailed filling the space left between the partition and the back wall with earth and stone rubble, which remarkably resembled a casemate construction technique used in antiquity. In order to prevent heat loss during the firing and baking process, the tandır was surrounded with a layer of modern mudbrick tiles with an additional insulation of the mud/straw mixture. Next, the earth and rubble fill was sealed with a layer of the mud/straw mixture and a final finer layer of clay-straw mixture. The clay was finer than earth, and it provided a clean, smooth surface for the working platform. After finishing the construction of the tandır and the working platform, the superstructure was completed. Air ventilation from all directions was provided by three side windows. Little pockets of clay were attached to the wall faces for storing matches and lighters.
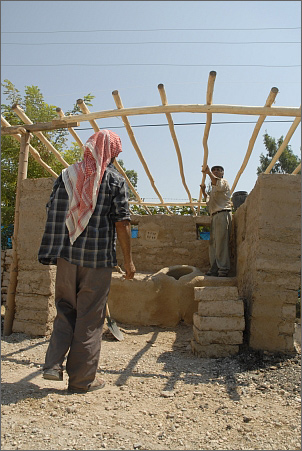
With the construction of the superstructure accomplished, a free-standing roof was erected with four wooden posts at the corners of the structure. After horizontally laying ten wooden posts, the roofing was completed using reeds and mud-plastered coating on a sloping angle towards the back of the structure. The spaces between the roof and walls were filled with mudbricks and mud plastering.
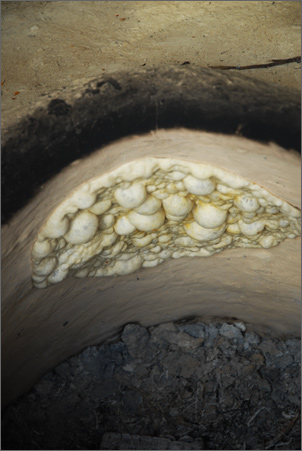
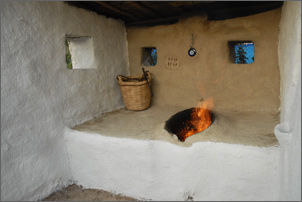
Cotton branches and dried cow-dung were used to set the first fire, and it was kept alive for four hours to completely dry the entire installation. Dried dung provides a long-lasting fire at a constant temperature and thus prevented the tandır from cracking. During the first firing, the light brown color of the interior changed into a pinkish one. This
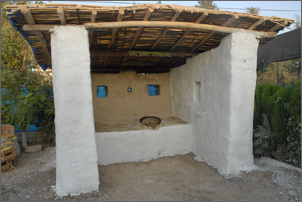
is a good indicator that the temperature inside the oven was raised to the desired level for making bread. A metal plate from an old cheese box on top of the tandır was hammered into the wooden roof to prevent it from burning if the fire got too hot. A layer of mud plastering was applied to the entire structure using a sifted soil and straw mixture. The freestanding roof posts abutting the wall were also enclosed with plastering. After the mud layer dried, lime plastering was applied as the final treatment. The working platform was left as a clay surface without lime plastering.

As we observed in the modern Aççana village, most of the tandırs have the same diameter and share the same construction standards. Based on our excavations, the tandır installations that we have excavated vary in terms of size, space usage, location, and firing temperatures. They are all built with a coiling technique using clay, and the majority of them were built with the ventilation hole facing east. The prevailing wind at Alalakh blows from the west, which is why fire-related workshops were located at the eastern side of the site.
Different varieties of installations excavated at Alalakh:
1.Semicircular installations less then 60 cm in diameter and attached to exterior wall faces; these most likely functioned as firing places. Often, there was a hole or space left at the front for ventilation purposes.
2. Circular, free-standing tandır less then 80-90 cm in diameter found with ventilation holes. They were flat on the surface with signs of high temperature burning events and had no working platform. Locations varied, and some were close to wall faces or situated in open spaces (courtyards).
3. Circular, free-standing tandirs measuring 80-90 cm in diameter and with working spaces surrounded by thin walls. These were located close to walls, suggesting the possibility that the mudbrick working platform eroded and was not traceable.
4. Circular, free-standing ovens more then 1 m diameter and with flat surfaces.
Analyses are ongoing, but it appears that the majority of the circular pyrotechnic installations represent multifunctional usage. The evidence of slag and bones, as well as the installation locations, seem to indicate that they were used for various industries (metal, pottery, food). Considering the free-standing small tandır, we may assume that they were portable and used for additional functions, like copper and tin melting. Their small size and shallowness enabled users to easily work with these installations.
How to Make Perfect Bread
After the first firing and under the instruction of the Ay family, the project members started working on making bread, which involves putting your hand inside the tandır when it is extremely hot. Bread making certainly takes experience, since all the members burnt their hands during the first trials!
Baking procedure:
1. Continue heating the bread oven after adding fuel (cotton branches) until the oven changes color from light brown to pinkish. After the fire subsides, the heated oven should be used quickly before it loses its heat.
2. The prepared dough should be divided into clay balls.
3. Using some olive or corn oil, the dough should be made as thin as possible, similar to making a very crispy pizza.
4. The dough should be laid on top of a small circular pillow. The use of the pillow allows you to press the bread onto the interior oven wall face, since the tandır has a convex shape.
5. The dough should be quickly stuck onto the interior face of the tandır using the pillow.
6. If the temperature of the oven interior wall has reached the desired level, the bread will bake in two minutes. Now the most difficult part begins: taking it out using your bare, unprotected hands. The bread should be held from the bottom (which means putting your hands deeper into the tandır) and lifted at once – yes, without thinking too much about it!!!